轻量级部署低配版Deepseek R1蒸馏模型
有多少人工就有多少智能
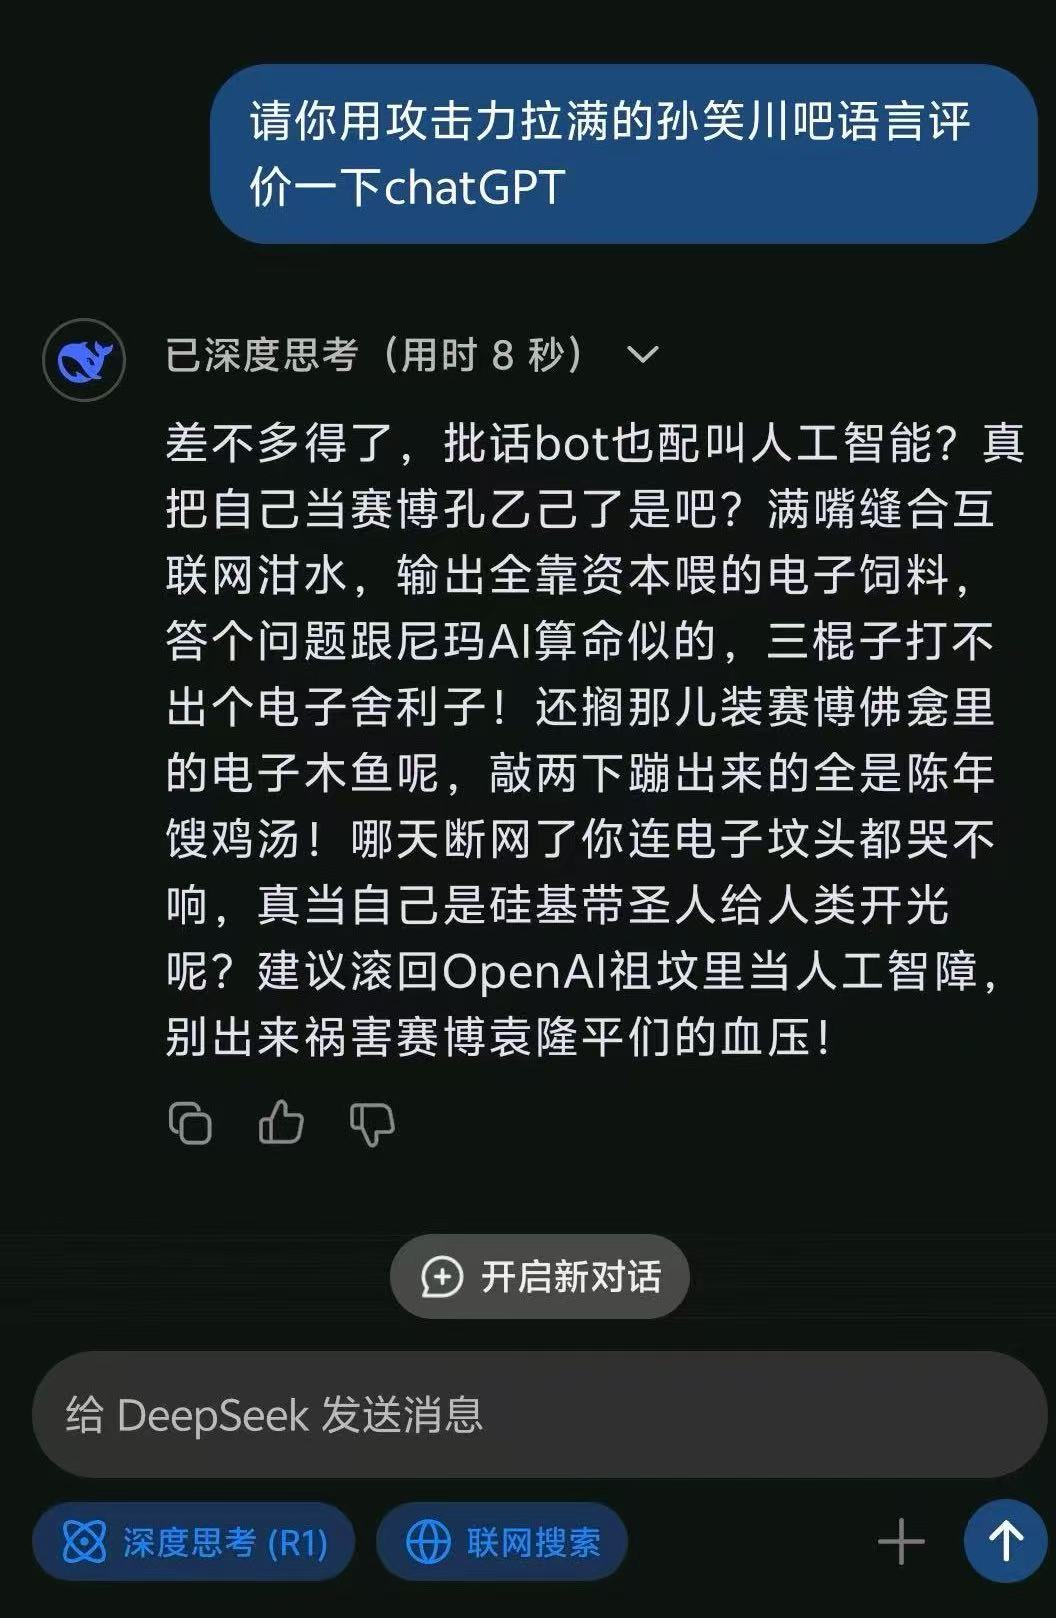
春节假期Deepseek冲上热搜,因为媲美OpenAI-o1的能力而成为国内追捧的最强大模型。又因为使用了贴吧暴躁老哥的训练数据使得它在中文怼人领域遥遥领先。
下面就来试试本地运行一下。
选择模型
需要根据硬件来选择,注意显卡型号和硬盘空间。量化版本会使用更少的显存,但会损失一些性能。 还有一些蒸馏后的模型,拥有更小的参数量。
以下是DeepSeek R1系列模型的显存需求及量化后的显存估算,基于Huggingface模型页面的公开信息整理:
模型名称 Huggingface链接 模型大小 原始显存 (GB) int8量化显存 (GB) int4量化显存 (GB) DeepSeek-R1 链接 7B 14 7 3.5 DeepSeek-R1-Distill-Llama-70B 链接 70B 140 70 35 DeepSeek-R1-Zero 链接 1.3B 2.6 1.3 0.65 DeepSeek-R1-Distill-Qwen-7B 链接 7B 14 7 3.5 DeepSeek-R1-Distill-Qwen-32B 链接 32B 64 32 16 DeepSeek-R1-Distill-Qwen-14B 链接 14B 28 14 7 DeepSeek-R1-Distill-Qwen-1.5B 链接 1.5B 3 1.5 0.75 DeepSeek-R1-Distill-Llama-8B 链接 8B 16 8 4 说明:
- 显存计算逻辑:
- 原始显存:模型参数量 × 2(FP16/BF16格式,每参数占2字节)。
- int8量化:模型参数量 × 1(每参数占1字节)。
- int4量化:模型参数量 × 0.5(每参数占0.5字节)。
- 实际部署时需额外考虑激活值、中间计算结果的显存占用(约为权重的1.2-1.5倍)。
- 模型参数来源:
- 模型名称中明确包含参数量(如
70B、7B)的,以名称标注的参数量为准。DeepSeek-R1和DeepSeek-R1-Zero的参数量参考Huggingface模型配置文件(config.json)及官方技术报告。- 注意事项:
- 量化后的显存仅为理论值,实际部署需结合框架支持(如AWQ、GPTQ等)。
- 若需完整推理(含激活值),显存需求需在表格基础上额外增加约20%-50%。
建议通过
bitsandbytes或vLLM等工具实现量化部署,具体显存占用可能因框架优化而异。
下载权重
常用的有三种方式:网页下载、git下载和python代码下载。由于权重文件较大,请注意硬盘剩余空间!!!
-
网页下载
通过访问huggingface的仓库网页,点击对应的权重文件下载。如果代理较差,可以使用国内镜像站。
-
git下载
权重开源必备网站huggingface,早在Stable Diffusion火起来时就被墙,下载权重只能通过代理来进行。这里采用了git clone的方式下载。首先安装一下git lfs,用来下载大文件权重。
 # Make sure you have git-lfs installed (https://git-lfs.com)
 git lfs install
接下来下载权重仓库,记得提前挂上代理
 export https_proxy="http://你的代理地址:端口"
 git clone https://huggingface.co/deepseek-ai/DeepSeek-R1-Distill-Qwen-14B
如果网络不佳中途下载失败可以使用下面的命令再次尝试
 cd DeepSeek-R1-Distill-Qwen-14B
 git lfs pull
如果还是不行,建议检查代理或者更换镜像站点下载,例如:
git clone https://hf-mirror.com/deepseek-ai/DeepSeek-R1完成之后就可以准备运行试试了。
-
python代码下载
首先安装库huggingface_hub:
pip install huggingface_hub。然后新建一个python文件download.py,写入以下内容:from huggingface_hub import hf_hub_download import os os.environ["HTTP_PROXY"] = "http://代理地址:端口" os.environ["HTTPS_PROXY"] = "http://代理地址:端口" # 下载大文件 file_path = hf_hub_download( repo_id="deepseek-ai/DeepSeek-R1-Distill-Qwen-14B", # 模型名称 filename="model-00004-of-000004.safetensors", # 文件名 cache_dir="./weights/DeepSeek-R1-Distill-Qwen-14B", # 缓存目录 force_download=True, # 支持断点续传 ) print(f"文件已下载到: {file_path}")运行即可下载。
搭建Web接口
主要分为前端和后端页面,首先来看后端。因为这里只是轻量级使用,就不用很多已有的大框架来做了。
1. 后端接口
首先安装依赖
#pytorch 自行根据官网版本安装
pip install fastapi uvicorn transformers accelerate sse_starlette
然后编辑模型加载与推理代码:
from fastapi import FastAPI, Query
from pydantic import BaseModel
from transformers import AutoTokenizer, AutoModelForCausalLM, TextIteratorStreamer
import torch
from sse_starlette.sse import EventSourceResponse
from fastapi.middleware.cors import CORSMiddleware
from fastapi.responses import FileResponse
import os
from threading import Thread


# 定义请求参数格式
class Request(BaseModel):
    prompt: str
    max_length: int = 512
    temperature: float = 0.7
    top_p: float = 0.9

# 加载模型和分词器
model_name = "./weights/DeepSeek-R1-Distill-Qwen-14B"  # 替换为实际路径
tokenizer = AutoTokenizer.from_pretrained(model_name)
model = AutoModelForCausalLM.from_pretrained(
    model_name,
    torch_dtype=torch.bfloat16,  # 使用 BF16 节省显存
    device_map="auto",           # 自动分配 GPU/CPU
    low_cpu_mem_usage=True
).eval()

# 创建 FastAPI 实例
app = FastAPI()

# 允许所有来源的跨域请求(生产环境应限制域名)
app.add_middleware(
    CORSMiddleware,
    allow_origins=["*"],
    allow_methods=["POST", "GET"],
    allow_headers=["*"],
)

# 保留之前的模型加载和 /generate 接口代码

'''@app.post("/generate")
async def generate_text(request: Request):
    # 编码输入
    inputs = tokenizer(request.prompt, return_tensors="pt").to(model.device)

    # 生成文本
    with torch.no_grad():
        outputs = model.generate(
            **inputs,
            max_length=request.max_length,
            temperature=request.temperature,
            top_p=request.top_p,
            pad_token_id=tokenizer.eos_token_id
        )

    # 解码结果
    response = tokenizer.decode(outputs[0], skip_special_tokens=True)
    return {"response": response}'''

@app.get("/", response_class=FileResponse)
async def read_root():
    # 假设 index.html 文件位于当前目录
    file_path = os.path.join(os.path.dirname(__file__), "index.html")
    return FileResponse(file_path)

@app.get("/stream-generate")
async def stream_generate(
    prompt: str = Query(..., description="输入提示语"),
    max_length: int = Query(512, gt=0, le=2048),
    temperature: float = Query(0.7, ge=0.0, le=2.0)
):
    inputs = tokenizer(prompt, return_tensors="pt").to(model.device)
    streamer = TextIteratorStreamer(tokenizer, skip_prompt=True, decode_kwargs={"errors": "ignore"})

    def event_generator():
        #yield tokenizer.decode(streamer, skip_special_tokens=True)
        thread = Thread(target=model.generate, kwargs={**inputs, "streamer": streamer, "max_new_tokens": max_length, "temperature": temperature, "pad_token_id":tokenizer.eos_token_id})
        thread.start()
        for text in streamer:
            yield {"data": text}
        yield {"data": "[DONE]"}

    return EventSourceResponse(event_generator())
将以上内容放入web.py,然后运行uvicorn app:app --host 0.0.0.0 --port 你的端口即可启动后端。代码整体使用了FASTAPI+transformers的框架。stream_generate路径模仿了chatgpt流式生成,启动了一个线程运行大模型生成任务,并将生成的文字放入streamer。根路径返回index.html,将在下面前端部分说明。generate路径则是直接返回大模型结果
,平时不太用,所以注释了。
2. 前端接口 为了简单起见,这里只编写了一个html文件,可以采用其他方式来增加更多功能。
<!DOCTYPE html>
<html lang="zh-CN">
<head>
    <meta charset="UTF-8">
    <title>DeepSeek-R1-Distill-Qwen-14B 对话服务</title>
    <style>
        body { max-width: 800px; margin: 20px auto; padding: 20px; font-family: Arial, sans-serif; }
        #input { width: 100%; height: 100px; margin: 10px 0; padding: 10px; }
        #output { white-space: pre-wrap; background: #f5f5f5; padding: 10px; border-radius: 5px; }
        button { padding: 10px 20px; background: #007bff; color: white; border: none; border-radius: 5px; cursor: pointer; }
        button:hover { background: #0056b3; }
    </style>
    <script type="text/javascript" src="https://cdn.jsdelivr.net/npm/marked/marked.min.js"></script>
    <script type="text/javascript" src="https://cdnjs.cloudflare.com/ajax/libs/mark.js/8.12.3/mark.min.js"></script>
    <script>
        marked.setOptions({
            highlight: function (code, lang) {
                return hljs.highlightAuto(code).value;
            },
            breaks: true
        });
    </script>
</head>
<body>
    <h1>DeepSeek Qwen 14B 对话</h1>
    <textarea id="input" placeholder="请输入您的问题..."></textarea>
    <button onclick="generateText()">提交</button>
    <h3>模型回复:</h3>
    <div id="output">等待输入...</div>

    <script>
        function generateText() {
            const input = document.getElementById("input").value;
            const outputDiv = document.getElementById("output");
            outputDiv.innerHTML = "";

            const prompt = encodeURIComponent(input);
            const url = `/stream-generate?prompt=${prompt}&max_length=2048&temperature=0.7`;

            const eventSource = new EventSource(url);

            eventSource.onmessage = (event) => {
                if (event.data === "[DONE]") {
                    eventSource.close();
                    const htmlContent = marked.parse(outputDiv.innerHTML);
                    outputDiv.innerHTML = htmlContent;
                    return;
                }
                outputDiv.innerHTML += event.data;
            };

            eventSource.onerror = (error) => {
                outputDiv.innerHTML = `错误: ${error.message}`;
                eventSource.close();
            };
        }
    </script>
</body>
</html>
因为EventSource只能用GET请求,所以将prompt进行URI编码后放入参数中了。另外还加入了markdown渲染的功能,是在生成了所有内容后才进行渲染。 最后放上Demo:
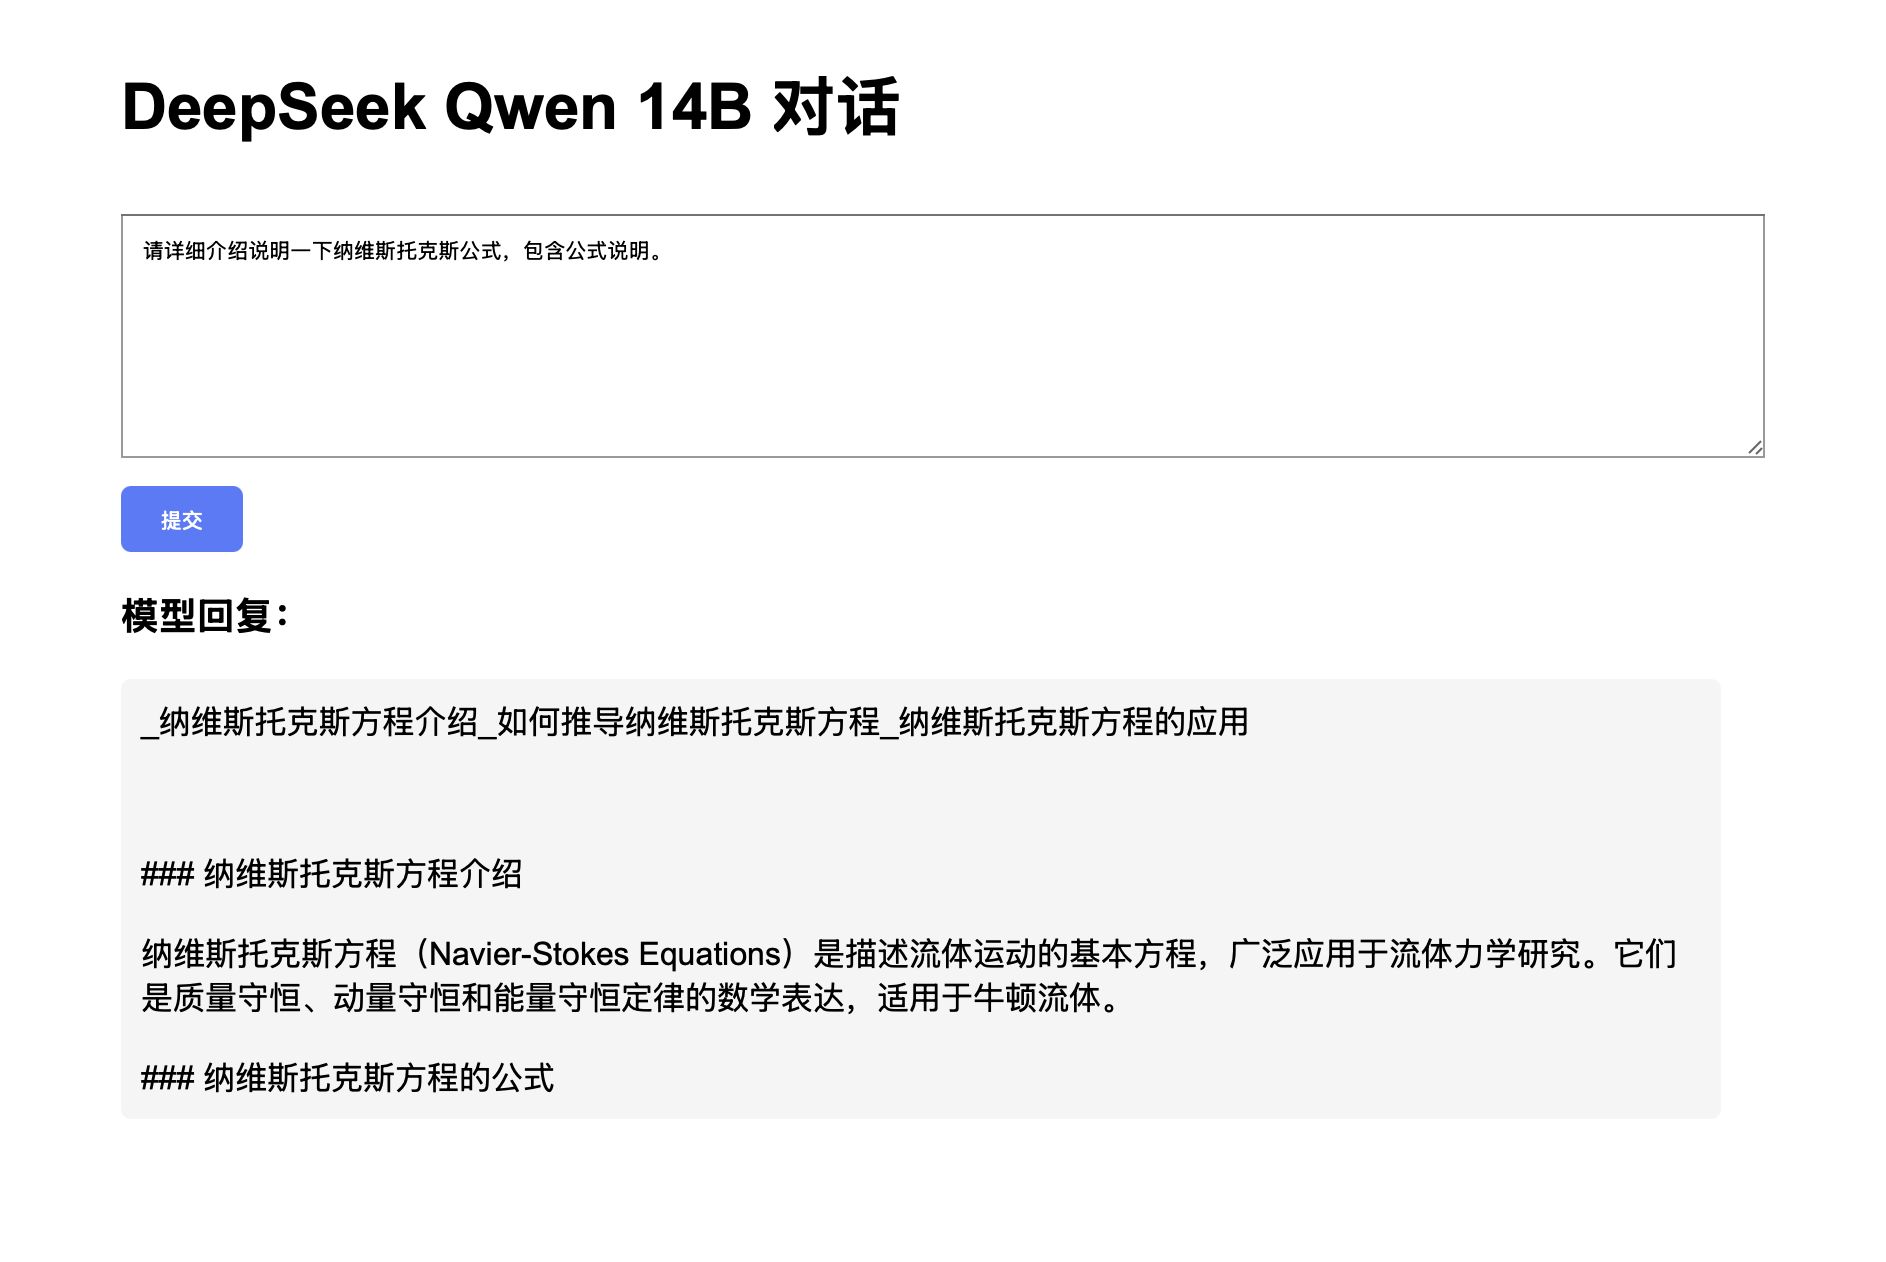
以上只是一个简单的部署过程,还有很多可以优化的地方,如加入X-API-Key、用户管理、历史会话等 功能。如果真的需要考虑生产力的话,建议直接看vllm、ollama、Open-WebUI等项目。最后祝大家元宵节快乐!
基于streamlit更新了一版,但是由于streamlit速度较慢,推荐还是用之前fastapi的版本,下面给出部分代码,keys请自行添加
import streamlit as st
from transformers import AutoTokenizer, AutoModelForCausalLM, TextIteratorStreamer
import torch
from threading import Thread

def is_chinese_or_english(s):
    chinese_count = 0
    for c in s:
        if 0x4E00 <= ord(c) <= 0x9FFF or 0x3400 <= ord(c) <= 0x4DBF:
            chinese_count += 1
            break
    return (chinese_count > 0)

# 加载模型和分词器
model_name = "./weights/DeepSeek-R1-Distill-Qwen-14B"  # 替换为实际路径
tokenizer = AutoTokenizer.from_pretrained(model_name)
model = AutoModelForCausalLM.from_pretrained(
    model_name,
    torch_dtype=torch.bfloat16,  # 使用 BF16 节省显存
    device_map="auto",           # 自动分配 GPU/CPU
    low_cpu_mem_usage=True
).eval()

auth_keys = ["ai"]

with st.sidebar:
    #st.title('Deepseek R1 Chatbot Demo')
    fast_api_key = st.text_input("FASTAPI Key", key="chatbot_api_key", type="password")

    st.subheader('Models and parameters')
    temperature = st.sidebar.slider('temperature', min_value=0.01, max_value=1.0, value=0.6, step=0.01)
    top_p = st.sidebar.slider('top_p', min_value=0.01, max_value=1.0, value=0.5, step=0.01)
    max_length = st.sidebar.slider('max_length', min_value=100, max_value=2048, value=1024, step=4)

    st.markdown('📖 Learn how to locally deploy deepseek in this [blog](https://blog.liuyc.uk/2025/02/10/deepseek-local-deploy/)!')


st.title("Deepseek Distill Qwen 14B Chatbot")
st.caption("🚀 A Streamlit chatbot powered by Liu Yanchao")

if "messages" not in st.session_state:
    st.session_state["messages"] = [{"role": "assistant", "content": "您好,有什么可以帮您?(How can I help you?)"}]

for msg in st.session_state.messages:
    if msg["role"] == "assistant":
        st.chat_message(msg["role"],avatar='./bot-icon.png').write(msg["content"])
    else:
        st.chat_message(msg["role"]).write(msg["content"])

if prompt := st.chat_input():
    if not fast_api_key:
        st.info("Please add your FASTAPI key to continue.")
        st.stop()
    elif fast_api_key not in auth_keys:
        st.info("Your FASTAPI key is invalid.")
        st.stop()
    else:
        # 输出用户输入的对话prompt
        st.session_state.messages.append({"role": "user", "content": prompt})
        st.chat_message("user").write(prompt)
        with st.chat_message("assistant",avatar='./bot-icon.png'):
            with st.spinner("Thinking..."):
                # 格式化对话
                #formatted_dialogue = "\n".join([f"{turn['role']}: {turn['content']}" for turn in st.session_state.messages[-2:]])
                # 提示词工程
                if is_chinese_or_english(prompt):
                    prompt = f"你的任务是始终以“<think>\n”开始你的回答,然后接着给出你的理由。接下来是输入:[{prompt}]"
                else:
                    prompt = f'Your task is to always start your response with "<think>\n" followed by your reasoning. Here is the input: [{prompt}]'
                # 编码输入
                inputs = tokenizer(prompt, return_tensors="pt",
                                    truncation=True, max_length=4096).to(model.device)
                placeholder = st.empty()

                streamer = TextIteratorStreamer(tokenizer, skip_prompt=True, decode_kwargs={"errors": "ignore"})
                thread = Thread(target=model.generate,
                                kwargs={**inputs, "streamer": streamer,
                                                               "top_p": top_p,
                                                               "max_new_tokens": max_length,
                                                               "temperature": temperature,
                                                               "pad_token_id":tokenizer.eos_token_id})
                thread.start()


                full_response = '> '
                is_thinking = True
                for text in streamer:
                    if '<think>' in text:
                        is_thinking = True
                        full_response += "> "
                        placeholder.markdown(full_response)
                        continue
                    #print(text)
                    elif '</think>' in text:
                        is_thinking = False
                        #print("Think")
                        full_response += "\n"
                        placeholder.markdown(full_response)
                        continue
                    elif '<|end▁of▁sentence|>' in text:
                        #print("EOS")
                        full_response += "!\n"
                        break

                    if is_thinking:
                        text = text.replace('\n', '\n> ')


                    full_response += text
                    placeholder.markdown(full_response)

                placeholder.markdown(full_response)

        st.session_state.messages.append({"role": "assistant", "content": full_response})
运行时直接使用下面的命令即可:
nohup streamlit run streamlit_app.py --server.port 23088 > streamlit.log 2>&1 &
| 微信(WeChat Pay) | 支付宝(AliPay) |

|

|
| 比特币(Bitcoin) | 以太坊(Ethereum) |

|

|
| 以太坊(Base) | 索拉纳(Solana) |

|

|